Enhancing the performance of your WordPress site can significantly improve user experience and SEO rankings. One effective way to achieve this is by integrating Redis, an open-source in-memory data structure store, used as a database, cache, and message broker. If you’re running WordPress in a Docker container managed via Portainer, installing the Redis extension can be a bit tricky. This guide will walk you through the process step-by-step, ensuring you have a smoother and more performant WordPress setup.
Step 1: Access the Portainer Web Interface
First, you need to log into Portainer. Open your preferred web browser and navigate to your Portainer URL, which might look something like http://localhost:9000. Enter your credentials to access the dashboard.
Step 2: Locate the WordPress Container
In the Portainer dashboard, proceed to the “Containers” section. Here, you’ll find your WordPress container listed among others. It’s important to correctly identify your WordPress container to make the appropriate changes.
Step 3: Open an Interactive Shell
After locating your WordPress container in the list, click on it to open its details page. From here, navigate to the “Console” tab and click on it. You’ll see an option to “Connect”; clicking this button will open an interactive shell inside the WordPress container.
Step 4: Install the Redis Extension
Within the container’s shell, execute the following commands to install the Redis extension:
apt-get update
apt-get install -y libzstd-dev zlib1g-dev
pecl install redis
docker-php-ext-enable redis
These commands update the package lists, install dependencies necessary for Redis, and enable the Redis extension in your WordPress setup.
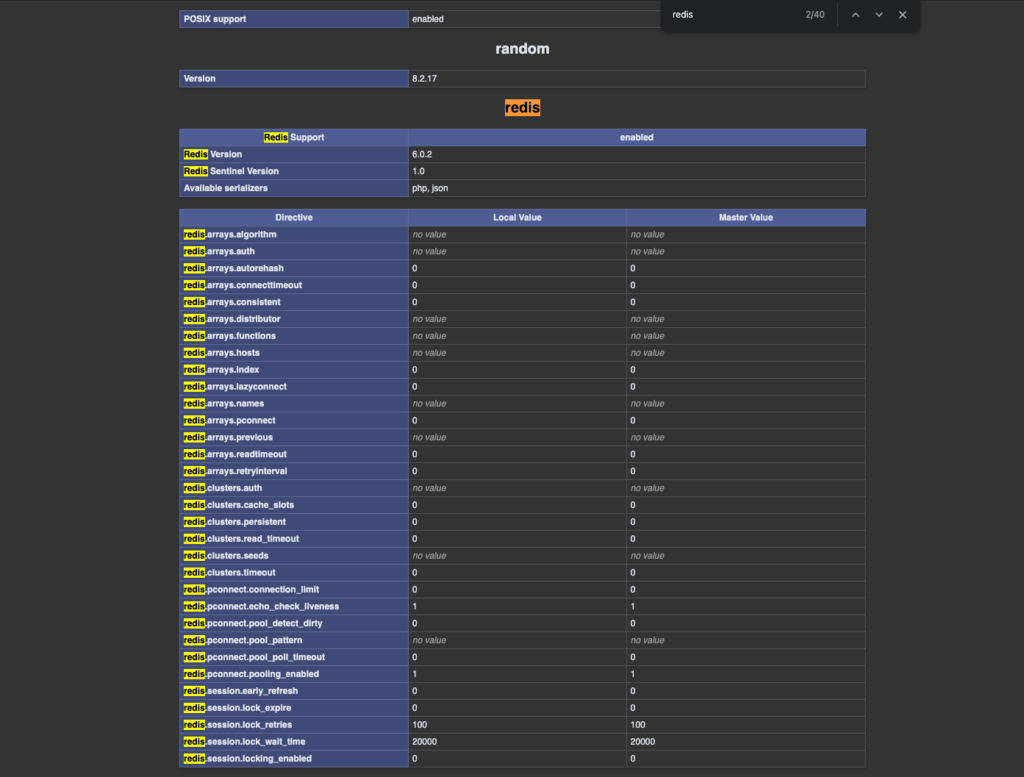
Step 5: Verify the Redis Extension
To verify that Redis is properly installed, still inside the container’s shell, type the following to create a PHP file:
echo "<?php phpinfo(); ?>" > /var/www/html/phpinfo.phpThen exit the container’s shell with the exit command. Access the newly created phpinfo.php via your web browser at an address like http://localhost/phpinfo.php. This page should display the Redis section if the extension is installed and enabled correctly.
Step 6: Configure Redis Connection in WordPress
To utilize Redis, modify your WordPress plugin or theme code to connect to the Redis server:
$redis = new Redis();
$redis->connect('redis', 6379);
In the above code, replace 'redis' with the hostname of your Redis container and 6379 with the port Redis is listening on (if you have a different setup).
Step 7: Restart the WordPress Container (Optional)
If you’ve made any changes to the code that require a restart, go back to the WordPress container details page in Portainer and hit the “Restart” button. This ensures all your new settings take effect properly.
Conclusion
By following these steps, you can successfully install and enable the Redis extension for your WordPress container running via Portainer. This integration not only enhances the performance of your WordPress site by speeding up database interactions but also helps in scaling your application efficiently. Remember, the exact steps might vary slightly depending on your specific Portainer and Docker configuration, so adapt the instructions as necessary.